
How to Start a Blog
In 2023, it’s simpler than any time in recent memory to begin a blog – regardless of whether you are a finished fledgling who doesn’t comprehend anything about coding or website composition.
With a tad of direction and the correct devices, you can have your special individual or expert blog going in under 30 minutes.
Making blog entries and substance can take longer, however.
In this bit-by-bit management, we’ll walk you through all aspects of the cycle while assisting you with dodging the basic missteps new bloggers will in general do.
Sounds great? At that point, we should make a plunge and begin.
Table of Contents
How to Start a Blog STEP 1 – Choose Your Blog Topic
The absolute first thing you need to do is choose a topic for your blog.
Best sites center around a certain something. May it be food, travel, fitness, lifestyle, fashion, or simply about your business.
We suggest picking a theme that you feel energetic about or keen on. It’s stunningly better when you are an expert at something, this helps you to grow your blog through writing good, quality content to help others.
Tips for choosing a blog topic:
It is safe to say that you are a specialist in something?
Is it correct to say that you are energetic about something?
Is it true that you are increasing some new useful knowledge and need to expound on your cycle?
Here’s an example: If you are highly interested in the lifestyle and you like to train, it’s wise to share your wisdom in a blog that is related to lifestyle or covers topics on training. Through the blog, you’ll be able to get new consumers.
You don’t need to select your blog topic right away, but it’s good if you already have something in mind.
How to Start a Blog STEP 2 – Find the Right Blogging Platform
First, Decide – A free Blog or a Self-Hosted Blog?
Everyone can sign up with a free blogging site or platforms such as Blogger.com, WordPress.com, and Tumblr.com
However, if you are honest about blogging, the free blogging platform is not a way to go.
There are numerous cons and disadvantages of free publishing content to a blog administration (restricted adaptation, customization, and traffic), yet above all – you’ll have no power over your blog.
And if you need to upgrade, you’ll need to pay more than you should.
The answer to this is to host your blog yourself (have a self-hosted blog).
In that manner, you’ll have no problem identifying with your blog content, (for example, pictures and recordings). Your blog will look more specialist, better looking, and can be improved later on. In addition, you own your blog.
Of course, if you don’t plan to blog for more than a few weeks, a free blog might make value. In every other case, we suggest the self-hosted way.
Which Blogging Platform Should I Choose?
There are many blogging platforms that you can choose from. Some are more flexible and easier to service, while some are more limited and come with a higher learning curve.
Most recent statistics show that WordPress which is
There are many blogging platforms that you can choose from. Some are more flexible and easier to service, while some are more limited and come with a higher learning curve.
Most recent statistics show that WordPress which is a free (open-source) blog platform is the most people-used blogging platform in 2020.
a free (open-source) blog platform is the most people-used blogging platform in 2020.

WordPress is followed by Blogger, Tumblr, Ghost, and Medium.
We’ve tried dozens of different blogging platforms, but none of them match WordPress.
Here’s why self-hosted WordPress is likely your best option:
- It’s free to use (open-source)
- It’s very flexible with hundreds of free (and premium) blog themes
- It has a large developer community
- WordPress is being updated and improved regularly
- You will have full control over your blog
How Much Will It Cost to Self-Host My WordPress Blog?
Luckily, not much! All you need is:
- Domain name – your web address, for example, www.YourBlog.com which is around $10/year, yet we’ll tell you the best way to get one for nothing later in this guide.
- Web hosting – administration to have your blog. Straightforward and solid web facilitating is ordinarily around $4/mo.
In total, it’s around ~$60/year, but it’s an important investment to your blog’s success.
If you think that blogging is not for you, you can regularly cancel the hosting service and many providers offer a 30-days unconditional promise.
Domain names can’t be refunded, but they will simply expire and become available once you stop paying for them.
We suggest going with the self-hosted route because it’s much more useful and you can start growing and creating your blog from day one.
How to Start a Blog STEP 3 – Set Up Your Blog Through Web Hosting (and Register Domain Name)
To get started with your Owner hosted WordPress blog, you’ll be going to need a domain name and web hosting.
We’ve been recommending HostGator as a blog/web hosting and domain registrar for years.
From HostGator, you will get (the account gets activated instantly):
- The custom domain name (free for the 1st year), with SSL certificate (security).
- Website hosting ($2.75/mo+)
- Simple, one-click install for WordPress
- Free email accounts.
Of course, you don’t need to use HostGator, especially when you already have a web host.
Whichever hosting organization you select, make confirm it has “one-click installs” for blogging platforms such as WordPress. This will make your setup action much easier.
If you get stuck registering a domain name and signing up for HostGator, below is a quick step-by-step guide that we made.
Install WordPress
Once you have signed up for Hostgator, you’re able to install your WordPress blog.
Don’t worry, most web hosting organization offer one-click installs for a WordPress blogging platform, so it should be very easy.
Here’s what you do exactly to get to install WordPress on HostGator
- Log in to your user profile at HostGator.
- On the “Home” page click on the blue button “WordPress”
- WordPress installation starts
We should note that your domain name activation enactment may take 10 to 15 minutes, so don’t go ballistic about the abnormal-looking brief space name.
HostGator will allow you to choose your admin login and password for WordPress when it’s done installing.
Experiencing any difficulties with this installation process? Read our other guide on installing WordPress HostGator.
If you are using a web hosting service, that doesn’t offer an automatic or quick install for WordPress, read this manual installation control.
How to Start a Blog STEP 4 – Configure Your WordPress Blog
When you have your admin account for WordPress all set up (the previous step), you can proceed to visit your new dashboard:
Just go to wedomain.com/wp-admin and input the access details for your admin account. When you log in, you’ll see this:

Even though WordPress is already 100% operational, there are still some settings that you should go through:
1. General Settings
Start by going to the left sidebar and clicking on Settings → General.
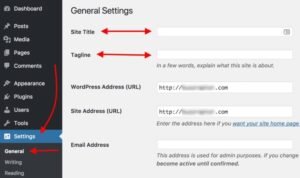
If you don’t do that, your blog might end up invisible to Google.
3. Permalinks
The “permalinks” settings define how WordPress will go about making individual URLs – webpage addresses – for each of your blog posts or sub-pages.
Though the idea might sound a bit advanced, setting this is extremely straightforward.
Just go to Settings → Permalinks. There, set your permalinks to the “Post name” variant, like so:
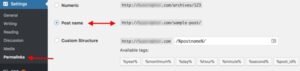
This is the most ideal setting of the ones accessible and the one favored by Google and other web indexes.
How to Start a Blog STEP 5 – Design Your Blog By Choosing a Theme
Another great thing about WordPress is that even though you might not be a skilled designer yourself, you can still get a top-shelf look for your blog.
How? Thanks to thousands of WordPress themes that are available out there on the web. Best of all, many of them are free, and you can customize them easily (without any coding knowledge).
Go back to your WordPress dashboard and navigate to Appearance → Themes. Once there, click on “Add New”:

Then, switch the tab to “Popular”:

What you will see are the most well-known free WordPress themes in the market. And the main part is that you can install any of them with just one click.
Feel free and spend a while browsing through this list to find something that suits your business and the main purpose behind your new blog.
When you do see a theme you like, you can get it installed onto your blog by clicking on “install” next to the theme’s name, followed by “activate”.
Note: What you doing here is simply changing the vibe of your blog. You’re not changing any of your substance. You can change your topics as frequently as you need, without agonizing over your pages evaporating.
How to Start a Blog STEP 6 – Add Logo, Change Colors and Structure
Even though the WordPress theme that you’ve decided to use already comes with its specific pre-configured design, you can still change parts of it to your liking.
This is all done if you go to Appearance → Customize. What you’ll see is the WordPress Customizer:
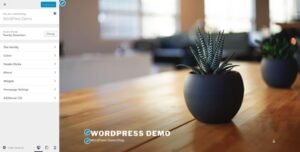
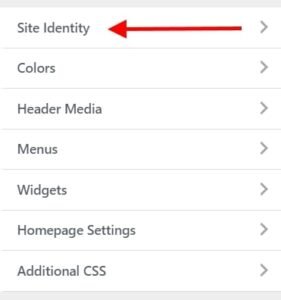
Contingent upon your present subject, you’ll get an alternate arrangement of choices in the sidebar menu, yet the most well-known ones will include:
- “Site Identity” – this is where you can set your blog title again, plus add a logo image and a site icon (aka. favicon).
- “Colors” – for adjusting the basic colors used throughout the design.
- “Header” – for setting your header graphic or image.
- “Background” – for setting your background graphic, image, or color.
- “Menus” – more on this later on.
- “Widgets” – more on this later on as well.
- And other, theme-dependent setting
- Let’s start with the first option:
1. Add Logo And Favicon
- If you don’t have a logo yet, you can use these free tools to create one.
- If you don’t have a favicon yet, you can use these favicon generators.
Since you most likely as of now have your site title and slogan set up, what you will do here is add your organization logo and favicon. Both are very simple to do:
To add your logo, simply click on the “Select logo” button.
On the next screen, WordPress will let you know what kind of designs are satisfactory for logos.
![]()
After uploading your logo, you should see it internal in the live preview.
To include your favicon, click on the button labeled “Select image” under the “Site Icon” section:
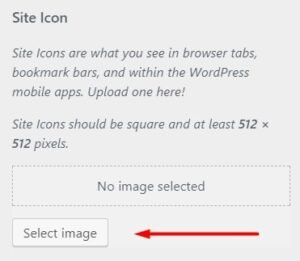
The process is truly similar here as well – WordPress will tell you what sort of image it’s expecting. However, the thing that’s unique here is that once you do add your favicon, it won’t get displayed anywhere in the preview.
To see it, look at the main top bar of your web browser, next to the blog title. An example from this site:
2. Change Blog Colors
Depending on the theme you’re using, you will see a contrasting set of options in this section of Customizer. Here’s an example from the default theme:
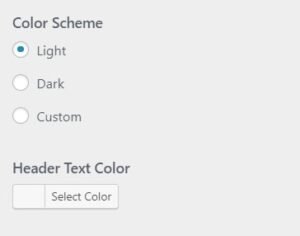
Just a couple of settings here, granted, but playing with these can still help you make your new blog look unique and more in tune with your brand.
3. Add Custom Header Graphic
This is another section that’s highly incapable of the theme that you’re using. Though, the most simple setting that you’ll stumble upon is the ability to add a header graphic/image, or perhaps even a header video. To fix your header image, just click on “Add new image”:

You can choose basically whatever image you want for your site header, as long as it’s of sufficiently high quality. WordPress will let you know about the essential requirements for your header image right on the upload screen.
4. Change Background
Some themes come with the ability to set the main background for your whole website.

Most regularly, these options will allow you to set a custom image or a solid color to be in the background. Either road, you can get quite interesting effects if you experiment with this long enough.
How to Start a Blog STEP 7 – Add/Write New Blog Posts and Pages
With the entirety of the above effectively done, you’re prepared to begin creating content for your new blog.
If you are building a blog, you’ll probably require a portion of the accompanying pages:
Blog – this one section WordPress makes for you automatically. By default, all your current blog posts are going to be listed right on the homepage.
About – to tell your visitors what the blog is about and who’s following it.
Contact – to let people contact you straight.
Services / Products – to list your products and/or services and tell people why they should buy them.
Testimonials – from your previous clients.
Portfolio – your body of work presented in an attractive road.
1. Create New Pages
Now that you have an idea of what sort of pages you might require, let’s talk about how to go about creating them.
Fortunately, the way toward making another page in WordPress is similar regardless of what kind of page that is.
Before doing such, you can likewise set your blog to a support mode, which will keep others from seeing your inadequate website.
To do that, go to your WordPress dashboard and afterward to Pages → Add New. What you’ll see is the principal page-altering screen of WordPress:

Here is an incredible overview of how adding posts and pages works on WordPress.
As you would imagine, once you click the “Publish” button, your page gets obvious to people in general.
2. Add Blog Posts
Blog usefulness is one of the core elements of the WordPress CMS. That is the reason WordPress has an entirely separate area committed to making and distributing blog posts.
You can discover it if you go to Posts from the main WordPress dashboard sidebar:

Making new posts work the same as Making new pages. The only difference is that your posts are going to be displayed automatically on your homepage, while your pages need to be added to a menu if you want anyone to find them.
3. Add Navigation Menu
Menus have an exceptionally uncommon undertaking in WordPress. Fundamentally, they are your best apparatus for making sure that the pages you’ve created can be found by your readers.
Normally, your blog should have one principal menu that’s placed in the main navigation bar. Most visitors will expect to discover something that affects your site.
To make a new menu, go to Appearance → Menus. Once there, look through the rundown of the accessible pages (the pages you’ve created so far) and click the checkboxes next to the ones that you need to have in your new menu. Then, click on “Add to Menu”. You’ll see your pages recorded in the section on the right.

At this stage, you can likewise move those pages to realign them.
At the point when you’re set, you can also choose one of the checkboxes under “Display location” (see below).
Most ordinarily, your primary route area should be listed there – in our case, it’s “Top Menu”.
When we click on the main “Save Menu” button, my menu is going to be fixed.
4. Change Your Blog Sidebar and Footer
Depending on the theme that you’re using, you might have anywhere from zero to a handful of sidebars available + maybe a customizable footer as well.
To tune up what’s displayed in all those areas, we’re going to use WordPress widgets.
In straightforward terms, widgets are little blocks of content that can be displayed in various places throughout a WordPress blog.
To perceive what is the issue here, simply go to Appearance → Widgets.
What you see here are all the different widgets that WordPress gives you. Just to name a few:
Archives – a list of all your past blog posts
Image – an image of your choice
Categories – a list of all your blog categories
Recent Posts
Search – a search bar
Text – a piece of custom text
and a lot more
What you can do with all those widgets is place them in one of the predefined widget areas – usually within the sidebar or the footer.
For example, we can drag-and-drop the “Recent Posts” widget to our “Footer 1” widget area, like so:

You can do the same with any of the other free widgets. Simply get them from the part on the left and simplified them onto any of the widget areas that your theme gives you.
Note The widget areas that you see in your admin panel depend on the theme that you’re at present utilizing.
Launch Your Blog and Keep Improving
Well done. You would now have the option to dispatch your new blog!
Wasn’t so troublesome, right?
Remember that each blog you make with WordPress is extraordinary. You can generally change WordPress themes or even purchase premium ones to truly make your blog look professional and unique.
Here is some further information that should help kick off your blogging journey:
WordPress Customization (101)
Step-by-step instructions to add a contact structure to your blog
Step-by-step instructions to add an email bulletin to your blog
How to monetize your blog
Instructions to get traffic to your blog (free and paid ways)
If you stall out or have any inquiries regarding this bit by bit direct, leave a remark underneath and we’ll take care of you🙂