

Do you want to drip content to your WordPress site automatically?

Why Add Drip Content in WordPress?
Drip content is where you gradually release posts, pages, videos, and other content instead of giving it away all at once.
If you have a membership website then releasing content automatically at regular intervals can keep members engaged for a long time.
If you have a library of previously-published content, new members may assume these posts are old and outdated. However, content dripping can make old content seem new and exciting, particularly if you let members know about the content using automated drip notifications or personalized email marketing.
You can also use drip content to sell more online courses.
Instead of giving students access to the entire course, you can release lessons across a scheduled training period so your students don’t feel overwhelmed. This can improve the learning experience, which will encourage students to buy more of your courses.
How to Add Automatic Drip Content to Your WordPress Site
To start, you’ll need a WordPress membership plugin that allows you to schedule drip content on your website.
This is where MemberPress comes in.
It is the best WordPress membership plugin on the market. It allows you to create paid subscriptions and set rules about who can access your content, and when. This makes it easy to create an advanced drip content schedule.
First, you need to install and activate the MemberPress plugin. For more details, see our step-by-step guide on how to install a WordPress plugin.
Upon activation, you must visit MemberPress » Settings and enter your license key into the ‘License Key’ field.
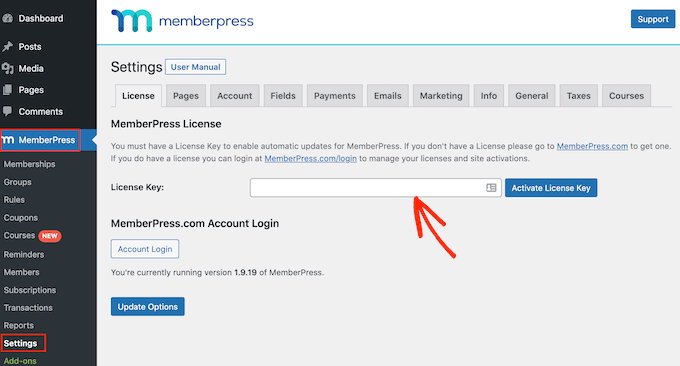
You can find the key by logging into your account on the MemberPress website. It’s also in the email you got when you purchased MemberPress.
After entering the license key, click on the ‘Activate License Key’ button.
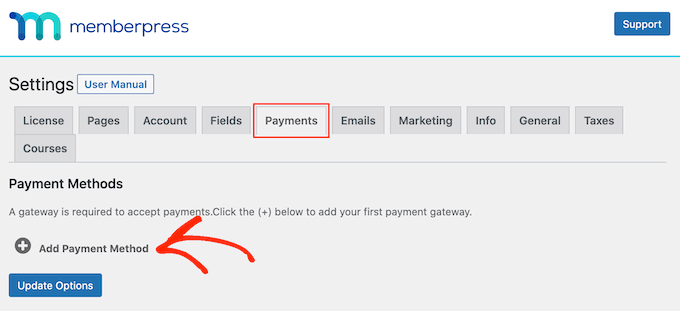
Next, you need to add a payment gateway so you can easily accept credit card payments in WordPress. To get started, select the ‘Payments’ tab and click on ‘Add Payment Method.’
MemberPress supports PayPal and Stripe payments under their Basic and Plus plans. You can also use Authorize.net by purchasing their Pro plan.
Simply open the ‘Gateway’ dropdown and select the gateway that you want to use.
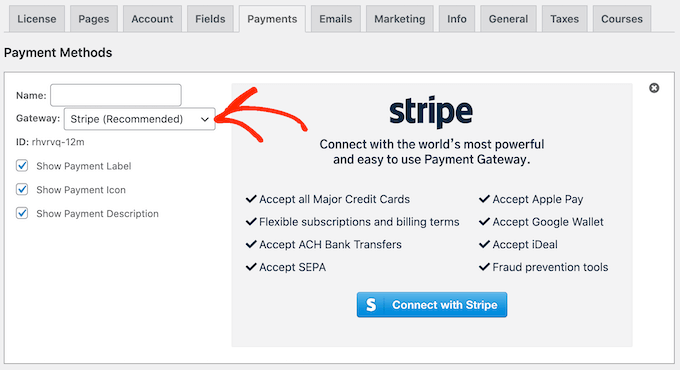
MemberPress will then show all the settings you need to configure in order to use this payment gateway.
These settings will vary depending on the gateway, for example in the following image we’re adding PayPal payment to WordPress.
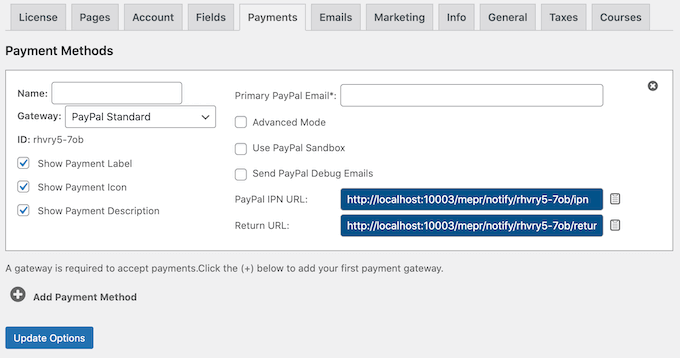
Once you’ve configured the gateway, click on ‘Update Options to save your settings.
You may be able to get more sales and improve the customer experience by allowing users to choose a payment method. To add multiple gateways to your site, simply click on Add Payment Method and repeat the same process described above.
Once you’ve added one or more payment methods, it’s time to add a membership plan.
Go to MemberPress » Memberships and click on the Add New button.
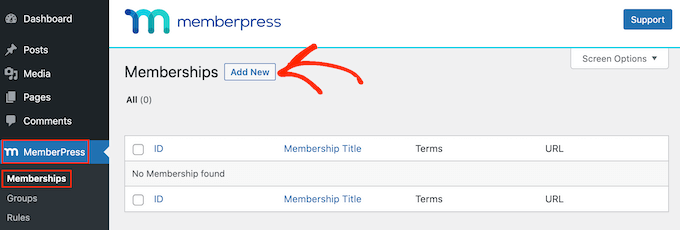
On the next screen, you need to type in a title for your membership plan. This will appear in your WordPress admin area and will also be visible to the people who visit your site.
After that, you can type an optional description into the main post editor.
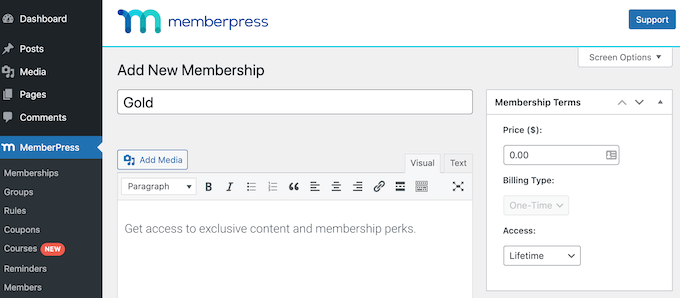
Next, type how much this membership will cost into the ‘Price’ field.
After that, open the ‘Billing Type’ dropdown and choose whether this is a one-time or recurring payment.
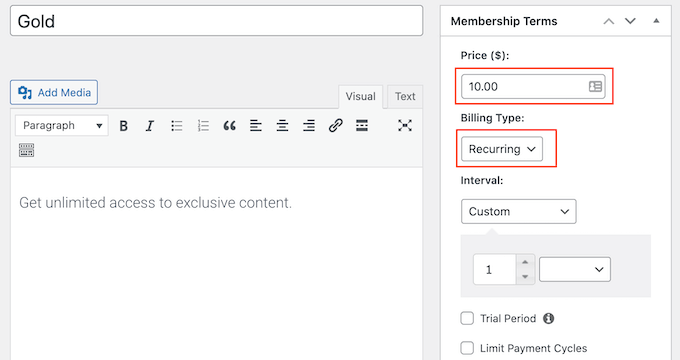
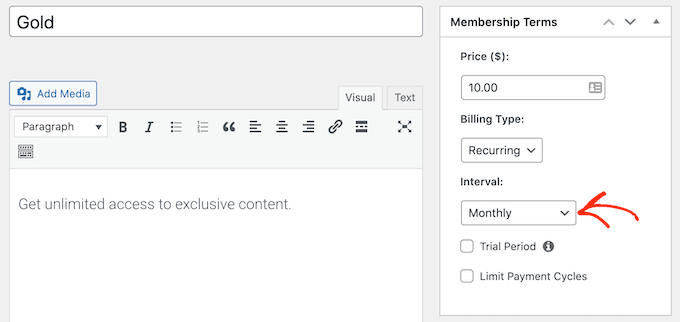
If you choose ‘Recurring’ then you can use the settings to charge members on a weekly, monthly, quarterly, or annual basis.
By accepting recurring payments in WordPress, you can automate the billing process. This can save you a ton of time and generally leads to fewer payment delays and errors. It also means you don’t have to send invoices manually.
The other option is a one-time payment, which can improve the user experience by giving members full control over whether they renew their subscriptions.
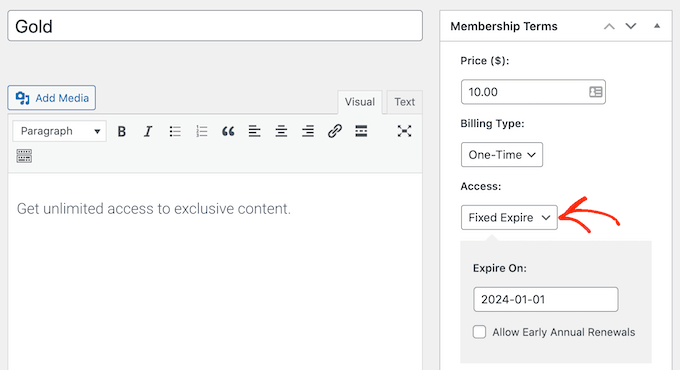
If you choose ‘One-Time’ then open the new ‘Access’ dropdown and choose between expire or fixed expire. ‘Expire’ lets you set how many days, months, weeks, or years the membership will last.
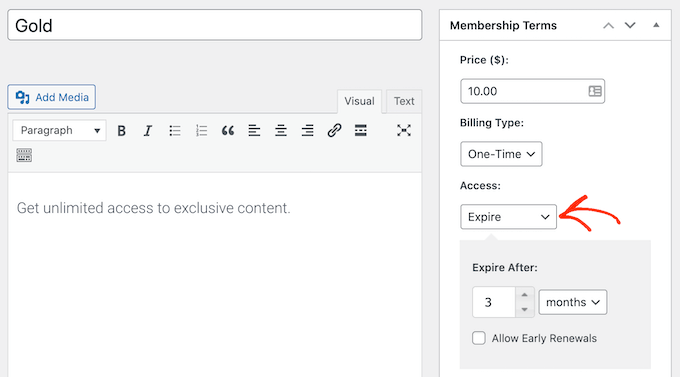
Meanwhile, ‘Fixed expire’ allows you to set a calendar date when the membership will expire.
‘Fixed expire’ may be useful if you want to keep all members on the same schedule. For example, all your memberships should expire on the 1st of the month.
The final choice is ‘Lifetime.’ Content dripping encourages people to renew their subscriptions, so you may want to avoid offering lifetime membership.
After choosing a billing type, there might be some extra settings you need to configure such as choosing whether to offer a trial.
Most of these settings are fairly straightforward, so after completing them scroll to the ‘Membership Options’ box which has all the different settings for your membership plan.
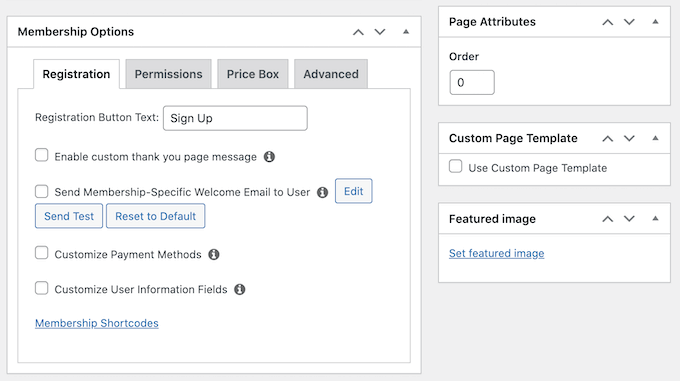
There are lots of different settings that you can look through, including a few that could improve the user experience.
To create a good first impression with your new members, we recommend enabling the custom to thank you message and custom welcome email.
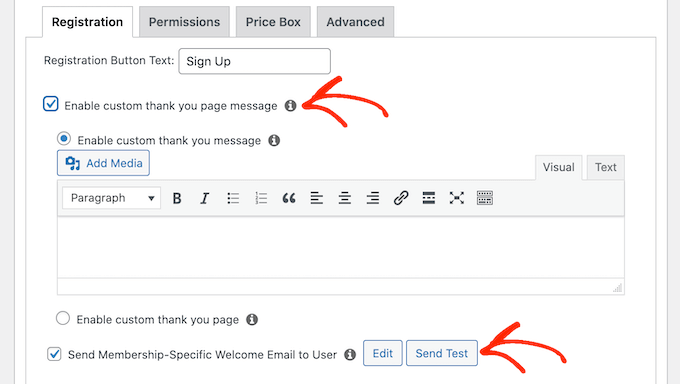
After checking these boxes, use the settings to create your customized message.
Tip: If you click on ‘Send Test’ and don’t receive an email, then there may be a problem with your WordPress configuration. If this happens then an SMTP service provider can improve your email deliverability rates.
When you’ve finished setting up your membership plan, click on the ‘Publish’ button to make it live.

To create more membership levels, just follow the same process described above.
Pro Tip: Once you’ve created at least one membership level, you’re ready to create drip content rules. However, there are still lots more features you can add to your membership website. To learn more, see our ultimate guide to creating a WordPress membership site.
Scheduling Automatically Drip Content Rules
MemberPress is a powerful plugin that lets you restrict access to your content in lots of different ways. For example, you can restrict WordPress pages by user role.
You can use these advanced rules to drip content and offer your members ongoing value.
To create a drip schedule, simply head over to MemberPress » Rules and click on the Add New button.
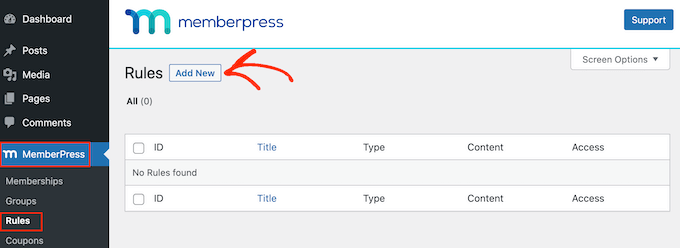
This takes you to a screen where you can create your rules.
MemberPress lets you restrict access to specific pages and posts. For example, you may only allow members to access a particular blog post after they’ve been a member for 10 days.
This may work well if you have a small amount of content, or you want to build a very detailed and precise schedule.
However, if you have lots of content then scheduling each page or post individually can take a lot of time and effort.
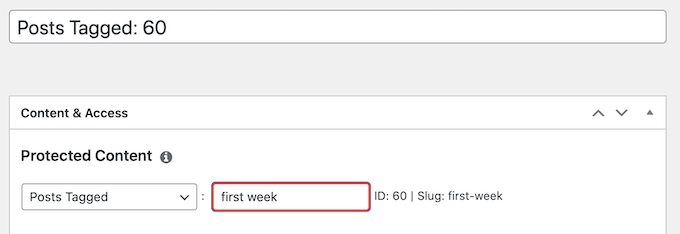
Thankfully, MemberPress also lets you create rules for specific categories and tags. This lets you release sets of related content, for example, you might give members access to all posts tagged ‘Beginner’s Guide’ during their first week of membership.
You might even go through your content library and label all the posts that you want to release together. For example, you might create a ‘First Week’ tag.
For more information, please see our step-by-step guide on how to add categories and tags for WordPress pages.
When you’re ready, open the ‘Protected content’ dropdown and choose the content that should use this rule, such as ‘A Single Post,’ ‘Posts Categorized,’ ‘Child Pages Of,’ or any other option in the list.
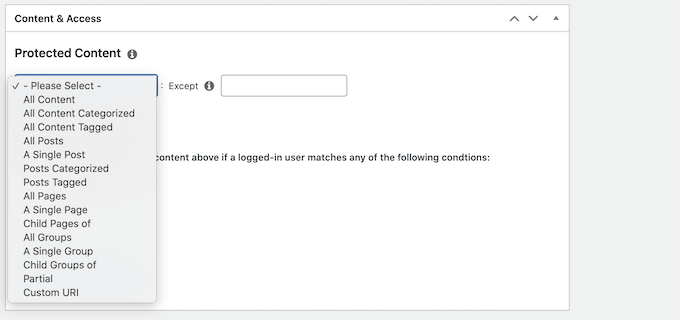
Depending on what you choose, you’ll get access to some extra settings. For example, if you select ‘A Single Page’ then you’ll need to type in the page that you want to use in the rule.
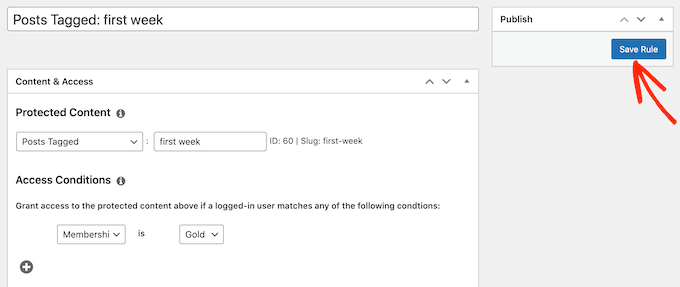
If you select ‘Posts Tagged’ then you can type in one or more tags.
Next, open the dropdown in the ‘Access Conditions’ section and select ‘Members.’
You can then simply open the second dropdown and choose the membership level this rule will apply.
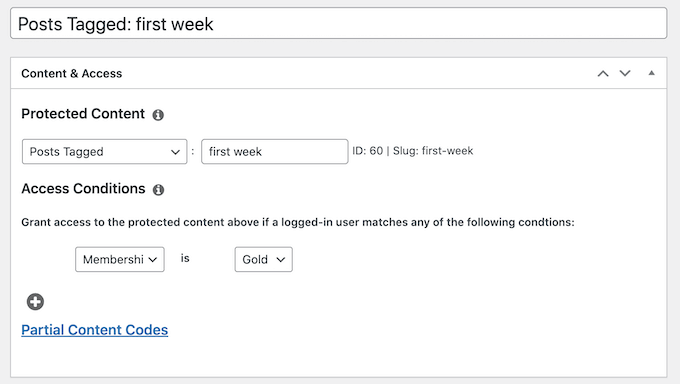
Next, you can tell MemberPress when to drip the content.
Scroll to ‘Drip /Expiration’ and check the ‘Enable Drip’ box to reveal some new drip settings.
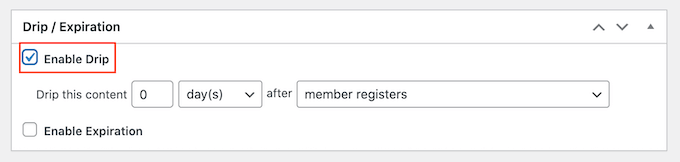
To start, use the dropdown to choose whether to release this content after a certain number of days, weeks, months, or years.
You can then type in a number. For example, in the following image, we’re releasing the content after 1 week.
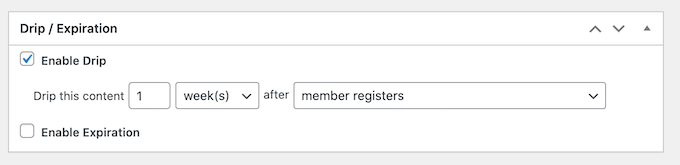
Once you’ve done that, use the ‘after’ dropdown to choose the event that should trigger the countdown. For example, you might drip the content 2 weeks after the member registers or 1 week after they buy a particular product.
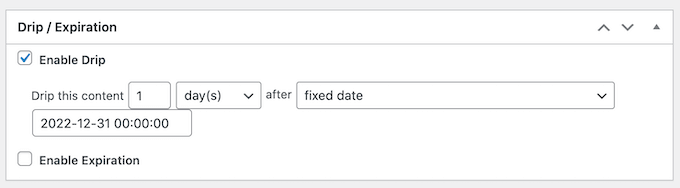
If you’re working with time-sensitive content, then you can even choose a fixed date. For example, you might publish a new post on Black Friday or announce a New Year giveaway or contest on the 1st of January.
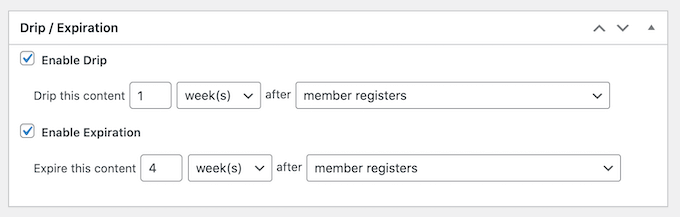
Optionally, you can set an expiration date by checking the ‘Enable Expiration’ box.
This can create a sense of urgency since the content is only available for a limited time. It can also encourage more people to buy memberships, so they don’t miss out on the time-restricted content.
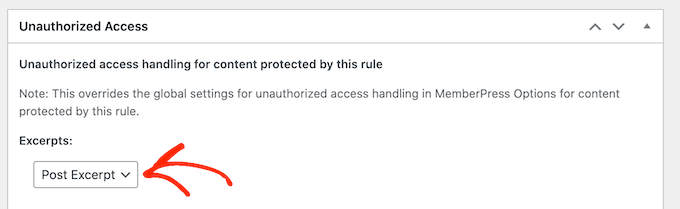
Once you’ve done that, scroll to ‘Unauthorized Access’ and decide what MemberPress will show to visitors who try to access the content without authorization.
One option is to tease visitors by showing an ‘Excerpt’ of the restricted content such as the first 100 characters or the post excerpt.
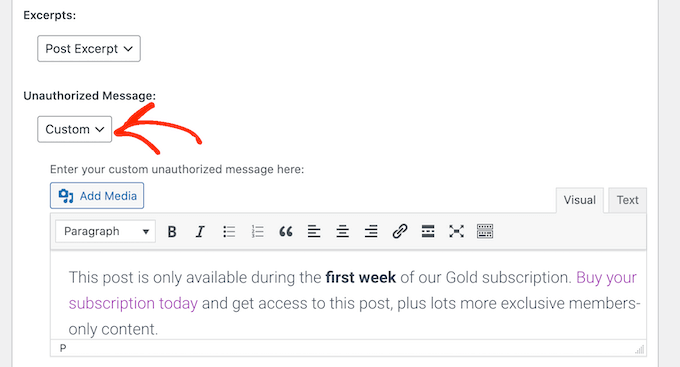
If you don’t set a custom message, then MemberPress will show the default unauthorized access message to all users. For this reason, we recommend creating your own message by opening the ‘Unauthorized’ message dropdown and choosing ‘Custom.’
For example, you might let visitors know they can unlock this content by buying a membership subscription.
Finally, it’s a good idea to show the MemberPress login form just in case the unauthorized visitor already has an account with your website. To do this, open the ‘Login form’ dropdown and click on ‘Show.’
Once you’re done, scroll to the top of the page and click on the ‘Save Rule’ button.
To add more rules simply follow the same process described above.
Tips on Managing Drip Content in WordPress
When used correctly, drip content can keep members happy and engaged, and get you lots of new registrations.
Here are a few tips to help you get even more new members, and keep those people engaged for a long time.
1. Plan a Smooth Content Strategy
It’s important to plan your schedule carefully. You don’t want to give away all of your content straight away, but there should be enough content to satisfy new members.
For this reason, it’s a good idea to create different membership accounts and test the customer experience. You can then fine-tune your content dripping rules so you’re providing a good experience to all users.
When testing your site, it’s important to hide your WordPress pages from Google and other search engines. If your premium content gets cached by the search engines during testing then unauthorized users may be able to access it for free.
There are a few ways to stop search engines from crawling a WordPress site but when your site is still in development we recommend putting it into maintenance mode.
2. Create an Email List
Email marketing is one of the most cost-effective ways to promote your drip content and get members back to your site. An email can also reinforce that this is new and exciting content that members should look at.
We recommend using Aweber to integrate your drip content strategy with your email marketing.
Aweber is the best email marketing service for small businesses and comes with easy automation tools that can help you set up automated campaigns for new subscribers.
These automated workflows can save you a lot of time and effort.
3. Promote Products with On-Site Retargeting
To grow your business, you’ll need people to renew their membership, upgrade their plan, or buy other products.
This is where OptinMonster comes on. It is the best conversion optimization tool that helps you sell more to your existing customers.

You can use OptinMonster to show members targeted messages with lightbox popups, slide-in boxes, countdown timers, and more.
It even has gamified spin-to-win options that you can use reward members with discounts, coupon codes, and other prizes.
4. Learn from User Behavior
Every site can benefit from tracking website visitors, which is why analytics is a must-have.
By monitoring what’s working and what’s not working on your membership site, you can continuously fine-tune your content dripping to get even more signups and renewals.
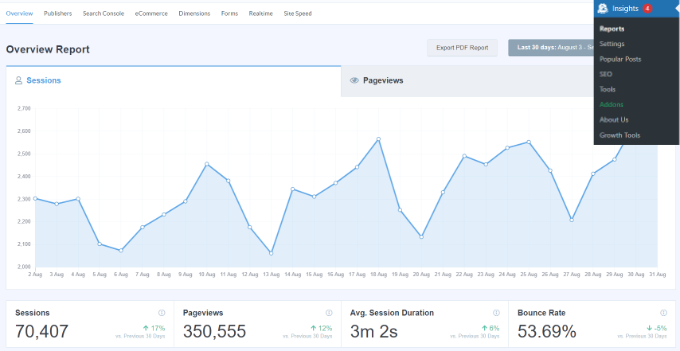
The easiest way to install Google Analytics in WordPress is by using MonsterInsights.
It is the best Analytics solution for WordPress and lets you monitor visitors and members from your site’s admin area.
With this data, you can make informed decisions and adjust your drip content strategy to grow your business.
To learn more, see our step-by-step guide on WordPress conversion tracking made simple.
We hope this article helped you learn how to add automatically drip content in WordPress. You may also want to see our guide on how to create a contact form in WordPress and our expert pick of the best live chat software for small businesses.