

So you need to make a WordPress blog…
learn WordPress free
How to Create and Start a WordPress Blog in 15 Minutes or less (Step by Step)
Congrats! WordPress is a great answer for how to begin a blog, in addition to we think websites are excessively wonderful!
Even better – it’s likewise Dreadfully easy to make a WordPress blog. That is the reason we state you can do it in less than 20 minutes.
However, as straightforward all things considered, to begin with, WordPress, understanding what you need to do and how you can do it is as yet significant so you don’t sit around idly.
That’s why we made this guide.
We’ll show you each and every progression you need to take to begin a blog utilizing self-facilitated WordPress. Also, we’ll do it with huge loads of screen captures and novice inviting guidelines
How to create a blog: what you’ll need
Simply a speedy note, however. This guide isn’t tied in with utilizing WordPress.com. All things being equal, we’ll tell you the best way to begin your own blog utilizing self-facilitated WordPress so that you’re in full control. This is our suggested approach.
In case you don’t know what the thing that matters is, you can peruse this post for additional on the contrasts between WordPress.com and WordPress.org/self-facilitated WordPress.
In the event that you need to make a blog, here’s a basic bit by bit manage:
1.Sign up for web hosting (we recommend HostGator).
2.Choose a hosting plan.
3.Pick a domain name for your blog.
4.Complete your hosting registration.
5.Install WordPress.
6.Log in and write your first blog post.
None of these means need a top to bottom specialized information and we’ll show you the entire cycle of how to set up a blog in detail.
When you get your blog going, you’ll presumably need to begin composing and likely change its appearance/usefulness. To support you with doing that, we’ll additionally tell you the best way to:
- Write your first blog post using the WordPress Editor
- Change how your WordPress blog looks using a “theme”
- Add functionality to your blog using tools called “plugins”
However long you realize how to utilize locales like Facebook and have generally speaking certainty with regards to “web stuff”, you can follow this guide. We guarantee!
learn WordPress free Step 1: Purchase hosting and your domain name
Making your blog accessible to people around the world requires two things:
Hosting – this is the motor that controls your site. While you don’t “see it”, each and every site on the Internet has a host driving it.
Domain – this resembles your blog’s lasting location. For instance, our own is themeisle.com. Look at this post on the off chance that you need support thinking of a decent name.
You can buy your facilitating and space simultaneously – so don’t stress a lot over the bare essential subtleties at this moment. In any case, before you can do that, you need to pick a WordPress to have.
Because of WordPress’s popularity, there are a huge number of WordPress hosts.
We’ve actually tried the exhibition and the unwavering quality of these hosts. Also, after that testing, we prescribe HostGator to new WordPress bloggers.
Here’s the reason:
- It’s moderate. You can have your site at the cost of a little latte every month – it’s simply $2.95 every month for your initial year.
- You get a free space name when you join. This connects to reasonableness – your own space would somehow or another expense $10+.
You can undoubtedly introduce WordPress. With only a couple of clicks, you can dispatch the WordPress programming and have a working website. No tech information required!
- It has enough execution to kick you off. At the point when you’re easily beginning, HostGator offers a lot of execution to keep your site stacking.
All in, it will cost you about $35.40 to have your blog at Hostgator for the whole year, which incorporates your free area name.
That’s about as cheap as it’s going to get if you want to create a WordPress blog.
How to sign up for WordPress hosting at HostGator
To begin, click here to go to HostGator.
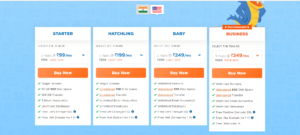
In the event that you look down on that page, you should see a list of HostGator’s WordPress hosting plans.
For novices, we suggest the modest STARTER arrangement since it packs a lot of intensity for your youngster blog. Snap the buy now catch to begin the cycle:
On the following screen, enter the domain name you want to use for your blog in the new domain box and click Next. Keep in mind – you get this for free:

On the final screen, you’ll need to enter basic account and billing details at the top:

As you look down, you’ll see a Package Information area at the base. Here, you can pick how long of facilitating administration to buy, just as any additional items that you need. While HostGator will check a portion of these additional items as a matter of course, you can securely de-select them:

All in, you should pay around ~$35 for your domain name and Twelve months of hosting.
Once you’ve filled in all of the information, click SUBMIT at the bottom to complete your purchase.
learn WordPress free Step 2: Install the free WordPress software
In the event that you need to make a WordPress blog, you’re going to, obviously, need to introduce WordPress programming.
We know this might sound a little intimidating – but we think you’ll be surprised by how easy it is to install WordPress.
When you completed the sign-up process in the previous step, you should have received an email from HostGator with details on how to log in to the HostGator Customer Area.
Go ahead and log in to HostGator.
As soon as you log in for the first time, HostGator will give you a simple wizard that takes you through the process of installing WordPress on your new site.
Don’t see the setup wizard? No worries, it’s still really easy to install WordPress with HostGator.
Simply go to the My Sites territory and snap the Create Site catch to dispatch the wizard:
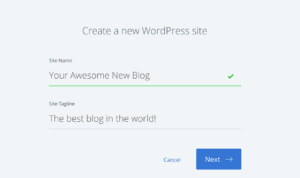
Then, you’ll be able to fill in all the important details for your site’s name and the username/password that you’ll use to manage your WordPress blog:
learn WordPress free Step 3: Go ahead and write your first blog post – you earned it!
Since you figured out how to make a WordPress blog, you’re most likely eager to get to writing for a blog!
We’ll tell you the best way to change how your blog looks and capacities in a second But first, let’s go over just how easy it is to write a blog post on your new website.
At the point when you first sign in to your blog’s WordPress dashboard, you should see a screen this way:
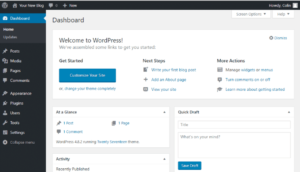
To write a blog post:
- Hover over Posts
- Click Add New

This will Start the WordPress Editor, which lets you write your blog posts using a really intuitive block system.
To add text, we just click and type. For other content – like an image or an embedded YouTube video, you can add new “blocks”.To help you utilize the manager, you can follow our definite guide here, or our all the more elevated level guide here.

learn WordPress free Step 4: Here’s how to change how your blog looks
When you create a WordPress blog, one of the major benefits that you get is access to WordPress’s huge collection of themes and plugins. Here’s a quick overview of the two:
Themes – these change how your blog looks
Plugins – these add functionality to your blog
We’ll cover the former in this section.
When you make a WordPress blog, you as of now have a subject dynamic. This is either the default WordPress theme or the theme that you chose during the HostGator Setup Wizard.
However, there are really a great many subjects accessible for WordPress, so you’re in no way, shape, or form restricted to that little determination.
Where to find WordPress themes for your blog
At the point when you go to pick a WordPress topic, you’ll need to pick among free and premium subjects. There’s no natural distinction between the two, however, premium topics frequently have more itemized plans and highlights.
To discover free subjects, the best spot to look is the authority WordPress.org topic registry. Another strong alternative is Just Free Themes for a more curated approach.
How to install a WordPress theme
Once you’ve found a theme that you love, WordPress makes it easy to add that theme to your site.
Here’s how:
- Hover over Appearance
- Select Themes
- Click the Add New button
- If you chose a free theme at WordPress.org, search for the theme by name and click Install.
- If you purchased a premium theme, click the Upload Theme button and upload the ZIP file you should have received when you purchased the theme
After installing your theme, make sure to click the Activate button to make it active on your site.
How to further customize your WordPress theme
To additionally alter your topic, you can utilize something many refer to as the WordPress Customizer. This interface allows you to make certain changes to your subject without having to know code.
You can get to it by going to Appearance → Customize:

Depending on the theme that you chose, you may have an alternate set of options in the left sidebar. But in general, you can:
- Make changes by using the options on the left
- See a continuous preview on the website preview on the right
- Make your improvements by clicking Save & Publish

For a more detailed guide, we have a full post on how to use the WordPress Customizer.
learn WordPress free Step 5: Here’s how to add functionality to your blog
While themes are generally about appearances, plugins are more focused on helping you add functionality to your blog.
When you first create a WordPress blog, you basically just can compose blog entries and make pages.
Plugins are what allow you to add further advanced functionality like:
- Contact forms
- Social network buttons
- Backups
- Improved SEO
- And lots, lots more
On the off chance that you can think about a component, there’s most likely a plugin for it.
That’s because the WordPress community offers over 50,000 free plugins, plus there are thousands of premium plugins.
Where to find WordPress plugins for your blog
Like topics, you can discover both free and premium modules.
Keeping the likenesses rolling, the best spot to search for nothing modules is at the authority WordPress.org module registry.
For premium modules, the best technique is as a rule to scan Google for something like “best X module” and purchase from a notable engineer.
Numerous free modules recorded at WordPress.org additionally offer premium forms with more highlights.
Must-have WordPress plugins for all sites
While there are a lot of specialty modules that are just useful for explicit utilizations, there are some must-have WordPress modules that all locales, including online journals, can profit by. Here is a portion of our recommendations:
- UpdraftPlus WordPress Backup Plugin
- Google Analytics for WordPress by MonsterInsights
- WP Super Cache
- Yoast SEO
- Wordfence Security
- Jetpack by WordPress.com
- Social Media Share Buttons & Analytics
- WPForms
- Optimal
How to install WordPress plugins
We already wrote a detailed guide on how to install WordPress plugins. But here’s the quick version:
- Go to Plugins → Add New
- If you chose a free plugin at WordPress.org, search for the plugin by name and click Install Now.
- If you purchased a premium plugin, click the Upload Plugin button and upload the ZIP file you should have received when you purchased the plugin.

Make sure to Activate the plugin after installing it.
You can always manage your existing plugins by going to the Plugins tab:
