
Table of Contents
How to Start an Online Boutique Shop that Drives Sales
Would you like to run your own online boutique shop however not certain how to begin?
In spite of mainstream thinking, you needn’t bother with any technical skills to start an online boutique. Frequently people prefer to buy from small/personal businesses, and your online boutique store could be the next success story.
In this article, we’ll tell you the best way to handily begin an online boutique shop that drives deals.

What Do You Need to Start an Online Boutique Shop?
Beginning your online store is a lot simpler than you might think. To start an online boutique shop, you need:
- A domain name (a name for your site)
- A web hosting account (this is the place where your site documents live on the web)
- Your full focus for 30 minutes.
Yes, you read that right. You can build an online boutique shop website without any preparation in under 30 minutes, and you don’t need any technical skills.
I will show you all you require to know, bit by bit.
Just follow our step by step checklist for starting a successful online boutique shop that drives sales. We will cover:
- Choosing and Setting Up Your Online Boutique Shop Platform
- Set Up WordPress and WooCommerce on Your Website
- Add Products to Your Online Boutique Shop
- Change or Customize Your WordPress Theme
- Add Plugins to Extend Your Online Shop and Drive Sales
- Learn More About WordPress
- FAQs About Setting Up an Online Boutique Shop
Tip: You can utilize the links in the checklist to jump straight to the relevant section of our online boutique shop tutorial.
1. Choosing the Best Online Boutique Shop Platform
The greatest mistake that new store owners make is choosing the wrong eCommerce platform for their online shop.
This could be an expensive mix-up on the grounds that not exclusively will it mean you’ll need to re-accomplish all the work, yet it could likewise mean losing cash.
Thankfully you’re here, so we can assist you to avoid making that mistake.
With regards to eCommerce stages for boutique shops, we recommend only two platforms: Shopify or WooCommerce (built on WordPress).
Shopify is a completely hosted solution that allows you to begin rapidly. The large disadvantage is the evaluation which begins at $29/month and goes up to $299 every month for highlights, excluding outsider expansions. Also, you’re limited to using their payment system otherwise they charge you additional transaction fees. This is a lot to spend on small business owners.
This is why most small business owners choose WordPress + WooCommerce. It’s cost-proficient, has all the features, flexibility, and it’s easy to setup. You can set it up in less than 30 minutes which is well worth it in the long run. WooCommerce is also the world’s most popular eCommerce platform.
For additional about these platforms, check out our side-by-side comparison of Shopify vs WooCommerce.
In this tutorial, we’ll walk you through how to begin an online boutique shop utilizing WooCommerce.
To start an online shop, you need to have three things: a domain name, web hosting, and an SSL certificate.
A domain name is your site’s location on the internet. This is what users type in their browsers to reach your website (for example google.com or wehavedigitaltool.com).
Web hosting is the place where your website files live on the internet. Think of it as your website’s house on the internet. Every website on the internet needs web hosting.
To wrap things up, you need an SSL certificate. This adds a special security layer to your website, so you can acknowledge credit cards and other individual data.
Note: Normally whenever purchased independently, a domain name costs around $14.99/year, web hosting costs around $8.99/month, and an SSL certificate costs around $69.99/year.
That’s a lot of startup cost.
Thankfully, HostGator, an official WordPress, and WooCommerce recommended hosting provider, has agreed to offer our users a free domain name, free SSL certificate, and a discount on web hosting.
This will help you keep the costs of building a WordPress site to an absolute minimum.
However, HostGator also has a dedicated WooCommerce hosting plan that comes with over 299/mo worth of premium WordPress and WooCommerce extensions which is totally worth it.
This costs $24.95 per month, but it includes security & backup features, premium WooCommerce extensions like subscriptions, bookings, etc.
Click here to Claim this Exclusive HostGator Deal
Note: At wehavedigitaltool, we trust in straightforwardness. In the event that you join with HostGator utilizing our outside reference, we will procure a little commission at no additional expense to you (truth be told, you will set aside cash and get a free space).
We would get this commission for suggesting pretty much any WordPress hosting company, yet we simply recommend things that we acknowledge will build the estimation of our Perusers.
If you’re looking for a HostGator alternative, then we recommend trying out Chemicloud WooCommerce hosting which is another officially recommended WordPress hosting provider.
You need to start by opening up the HostGator WooCommerce website in a new window and click the ‘Start Your Store’ button.

Next, you’ll be asked to select a hosting plan. Their PERFORMANCE plan, which costs $24.95 per month, comes with over $1,000 worth of PERFORMANCE WordPress and WooCommerce extensions.
It’s a great deal because the WooCommerce subscription and bookings extension alone cost more than the annual subscription of HostGator.
You need to click on the ‘Select’ button below a plan to continue.
Next, you’ll be prompted to enter or choose a domain name. Remember, you get a free domain named HostGator.
If you need help picking a domain name for your store,
you need to enter your record subtleties, for example, your name and address.
Beneath this, you need to confirm the package you’ve chosen is correct.
Tip: You get the biggest saving by signing up for a 36-month plan.
You can uncheck the bundle of additional items since you needn’t bother with them at this moment. You can generally add them later in the event that you like, and we’ll tell you the best way to get a portion of the comparative highlights free of charge later in the article.
After entering your payment details and purchasing your hosting, HostGator will prompt you to create your account. Once you have done so, you will be able to log in.
2. Set Up WordPress and WooCommerce on Your Website
The good part about the HostGator WooCommerce plan is that it comes with an automated wizard that guides you through the entire setup.
First, it will ask you how much help you need building your site. Simply click the ‘No Help Needed’ button, as you have this tutorial to help you.
select ‘Online Store’ for your site type and basically keep following the site creation wizard.
At the final step, HostGator will ask you to enter a name and a tagline for your website. You can change this later don’t as well concern on the off chance that you haven’t chosen at this point.

HostGator will now offer you some WordPress themes to choose from. If you are unsure, then you can start with the Storefront theme. You can change the WordPress theme later on.

After this, HostGator will install both WordPress and WooCommerce for you.
Once the screen refreshes, you’ll see your HostGator dashboard with the option to log in to WordPress.
Your WordPress site will open in a new window, and you will see your WordPress admin area.
HostGator gives you a free SSL Certificate. This certificate is pre-installed for your domain. However, your WordPress site needs to be configured, so that it loads using HTTPS vs HTTP.
Go to the Settings » General page and change your WordPress Address and Site Address to use HTTPS instead of HTTP.

Don’t forget to scroll down to the bottom of the page and click the ‘Save Changes’ button to store your changes.
Now, you can go ahead and set up your online store.
Simply click on the WooCommerce link on the left-hand side of your screen, then follow the WooCommerce setup wizard to set up your online store with your address, industry, product types, and business details.
After completing the setup wizard, you need to add payment methods to accept online payments on your boutique shop.
WooCommerce integrates with a number of popular payment gateways. The most popular are PayPal and Stripe (credit cards).
To connect WooCommerce to a payment gateway, go to the WooCommmerce » Settings page and switch to the Payments tab.
Here, you simply need to click the toggle in the ‘Enabled’ column for the payment method you want to use. We’re going to use PayPal Standard for our online store.

After switching on a payment method, click the ‘Set Up’ button to the right of it. For the PayPal Standard method, this will then take you to a page where you need to enter your PayPal email address.
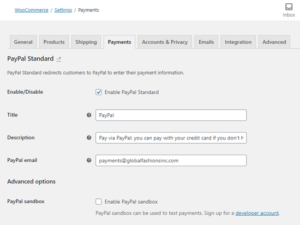
Once you’re done with the configuration, don’t forget to scroll down and click the Save Changes button at the bottom of the screen.
You can switch to the Payments tab again and add other payment methods.
Tip: We recommend switching on check payments and/or cash on delivery while setting up your online store. This makes it easy to create test orders without spending any money.
3. Add Products to Your Online Boutique Shop
Now that you’ve set up payment methods, it’s time to add products to your online store. If you haven’t done any product sourcing yet, check out our comprehensive guide on choosing the best products to sell online.
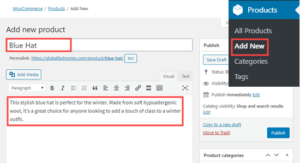
To add a product, go to the Products » Add New page in your WordPress admin area.
First, you need to enter the product title and then provide a detailed description. This not only helps to drive sales by giving potential customers the details they need, but it also helps your product page to rank in search engines.
Then, look down to the ‘Product Data’ section below the description box. You need to decide on your pricing and enter the Regular Price of your product. If it’s on sale, then you can set a Sale Price too.
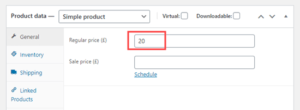
Under the Product Databox, you can optionally enter a short description of your product. This appears in areas where the long description will not fit.
Next, click on the ‘Set Product Image’ link on the right-hand side of the screen and upload product images.

Tip: we highly recommend that you optimize your images for the web to ensure that your website is always blazing fast.
Above the product photo upload area, you can also set your product categories and tags. We recommend giving your product at least one category.
Once you’ve entered all the details for your product, simply click on the Publish button to put it live on your website.

Repeat the same process to add more products if needed.
Once you’ve added your products, you can visit your site to see them listed on your Shop page.

4. Change or Customize Your WordPress Theme
Themes control the design template of your website. There are thousands of free and paid WordPress themes that you can choose from, and most of them are compatible with WooCommerce.
However, not all of them are ideal for a WooCommerce boutique shop.
By default, Bluehost may install the Storefront theme for you, or you may be using some other default theme right now.
You can change your website design by installing a different WordPress theme. Not sure which theme to choose, see our handpicked list of the best WooCommerce WordPress themes.

Once you have found the theme you like, you can download and install it. For help with installing WordPress themes, check out our beginner’s guide to installing a WordPress theme.
Most WordPress themes are highly customizable. For instance, you can change fonts, colors, header styles, backgrounds, and more.
Essentially go to the Appearance » Customize page to launch the theme customizer. You’ll see a live preview of your site with customization options in the left column.
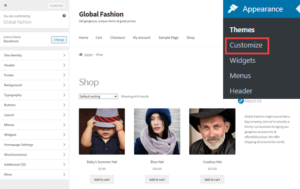
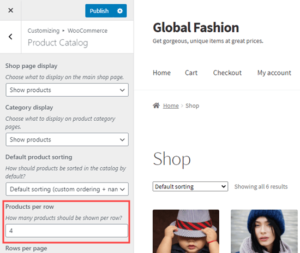
You can use the tabs down the left-hand side to change various aspects of your site. The WooCommerce options let you control how your store displays.
For instance, you can go to WooCommerce » Product Catalog to change how your Shop page looks. Here, we’ve set our shop page to have 4 images per row instead of 3 per row.
As soon as you make a change, you will see a live preview of your customization. Make sure you check that you are happy with all your pages, including functional ones such as the cart and checkout pages.
Once you’ve finished making changes using the theme customizer, you just need to click the Publish button on the top left. This saves your changes and makes them live on your website.
Pro Tip: If you want to further customize your WooCommerce store, you can use one of the drag & drop page builders, or use a styling plugin like CSS Hero to create custom styles without any code.
5. Add Plugins to Extend Your Online Shop and Drive Sales
Plugins are like apps for your WordPress site. They allow you to add new features to your online store. Some WordPress plugins are essential that all WooCommerce stores may need and some you can choose to add specific features.
The best part about WordPress is that there are over 58,000 plugins that you can use to add new features to your site without hiring a developer.
You can follow our step by step guide on how to install a WordPress plugin to install any of the plugins below.
Here are our recommendations for some of the most essential plugins for your online shop:
- MonsterInsights – leading WordPress analytics plugin that helps you track visitor stats (free version available).
- WPForms – #1 form builder for WordPress, trusted by 4 million websites. You can use it to build contact forms, surveys, polls, etc. (free version available).
- AIO SEO – leading WordPress SEO plugin that will help your store rank higher in Google and other search engines (free version available).
- UpdraftPlus – leading WordPress backup plugin that will help you make automated backups in case of an emergency.
- OptinMonster – #1 conversion optimization toolkit that will help you get more subscribers and sales (free version available).
- Sucuri – free website malware scanner plugin for WordPress.
- WP Mail SMTP – helps improve the email deliverability of your website, so customers get their receipt, login information, etc. (free version available).
Aside from these, we have our complete list of the best WooCommerce plugins that you may want to checkout for additional features.
Here are some of our other recommended WooCommerce plugins and tools that can help you make more sales.
LiveChat is one of the best live chat software in the market.
It allows you to offer continuous help to your clients from your PC, tablet, and cell phones. You can add your colleagues to accelerate answers.
They additionally have a subsequent item called ChatBot which causes you to fabricate keen work processes to naturally address client’s inquiries and lift deals.
You need more valuable ChatBot you can try the ChatterPal is AI. you can see this the Leverage Futuristic‘Artificial Intelligence’


AWeber is one of the best email marketing services in the market.
They let you interface with your clients by means of email, so you can send them item refreshes, new offers, and get them to purchase more.
AWeber comes with all the powerful features such as autoresponders, A/B testing, WooCommerce integration, personalized email automation, and more.
3.Use in influencer Marketing to sell & branding
An influencer is a Help to Branding & sell. Influencer marketing create content for your brand regarding in blog & Social media platforms like Instagram, Facebook
I have many influencer contacts in beauty brand & personal care brands other brands need like


your need influencer contact fill the contact form
If you liked this article, then please subscribe to our YouTube Channel for WordPress video tutorials. You can also find us on Instagram and Facebook.
FAQs About Creating an Online Boutique Shop
wehavedigitaltool is the largest free WordPress resource site for beginners. Our fundamental objective is to give accommodating and simple to follow WordPress instructional exercises for entrepreneurs, bloggers, and non-geek WordPress website designers. You can discover more about us here.
Do I need a business plan or business license to sell online?
No, you needn’t bother with a permit to operate to sell on the web. You can begin as a sole-ownership which is the thing that the vast majority do.
When your business begins to take off, you can enroll an authority LLC, organization, or private restricted organization dependent on your nation/legitimate purview.
Reducing this upfront cost and barriers can let you get started faster.
How do I choose the best products for my online store?
All boutique owners require to think about their target audience because it will have a huge impact on your overall success.
For example, an online clothing store aimed at 20-somethings might sell geeky t-shirts. An online clothing boutique for resigned boomers may zero in on useful however slick casual clothing.
We have a detailed guide on how to choose the best products to sell online.
Additionally, you can take a play out of drop shippers’ playbook and expand your product collection by using a dropshipping plugin. This allows you to sell items without the stock problem.
How can I make more sales?
You can make more deals from your eCommerce site by building an email list, becoming your web-based media following, or in any event, joining forces with influencers.
You could likewise utilize further developed promoting methodologies like retargeting guests who leave items in their shopping Cart.
Like any retailer, you need to pay attention to measure marketing efforts and track what works. Remember, your online business is competing against many other online stores like eBay and wholesalers, so you need to consider how to make your shop stand out.
Do I need to charge sales tax?
You may have to charge deals charge, contingent upon where you live. You should check your neighborhood government’s site for subtleties on this.
There are WooCommerce plugins that can handle sales tax for you.