
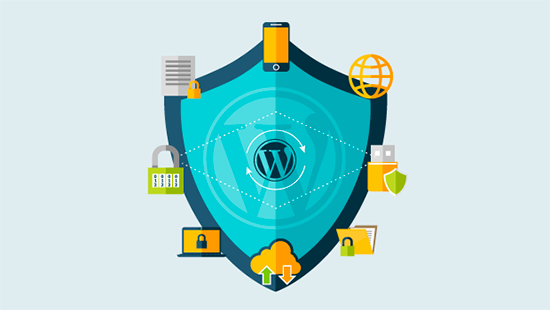
WordPress security may be a topic of giant importance for each website owner. Google blacklists around 10,000+ websites a day for malware and around 50,000 for phishing hebdomadally.
If you’re serious about your website, then you would like to concentrate on WordPress security best practices. In this guide, we’ll share all the very best WordPress security tips to help you protect your website against hackers and malware.
While WordPress core software is extremely secure, and it’s audited regularly by many developers, there’s tons which can be done to remain your site secure.
At Wehavedigitaltool, we believe that security isn’t almost risk elimination. It’s also about risk reduction. As an internet site owner, there’s tons that you simply can do to enhance your WordPress security (even if you’re not tech-savvy).
We have variety of actionable steps that you simply can fancy protect your website against security vulnerabilities.
To make it easy, we’ve created a table of content to assist you easily navigate through our ultimate WordPress security guide.
Ready? Let’s get started.
Why Website Security is Important?
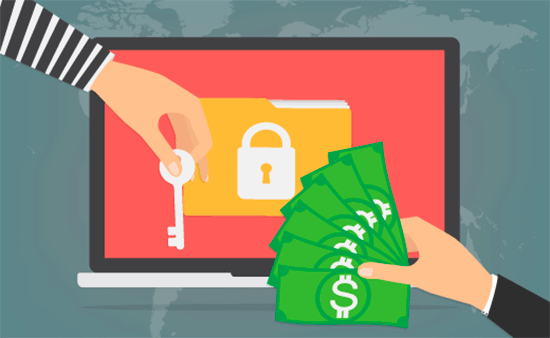
A hacked WordPress site can cause serious damage to your business revenue and reputation. Hackers can steal user information, passwords, install malicious software, and may even distribute malware to your users.
Worst, you’ll end up paying ransomware to hackers just to regain access to your website.
In March 2016, Google reported that quite 50 million website users are warned a couple of website they’re visiting may contain malware or steal information.
Furthermore, Google blacklists around 20,000 websites for malware and around 50,000 for phishing hebdomadally .
If your website may be a business, then you would like to pay extra attention to your WordPress security.
Similar to how it’s the business owner’s responsibility to guard their physical store building, as a web business owner it’s your responsibility to guard your business website.
Keeping WordPress Updated
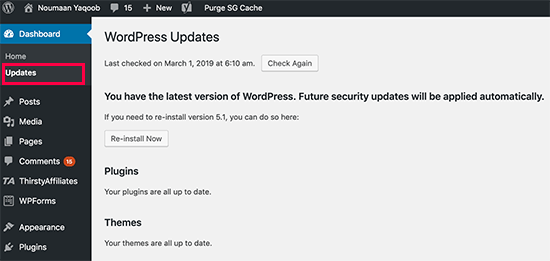
WordPress is open-source software that’s regularly maintained and updated. By default, WordPress automatically installs minor updates. For major releases, you would like to manually initiate the update.
WordPress also comes with thousands of plugins and themes that you simply can install on your website. These plugins and themes are maintained by third-party developers who regularly release updates also.
These WordPress updates are crucial for the safety and stability of your WordPress site. You need to form sure that your WordPress core, plugins, and theme are up so far.
Strong Passwords and User Permissions

The most common WordPress hacking attempts use stolen passwords. You can make that difficult by using stronger passwords that are unique for your website.
Not only for the WordPress admin area, but also for FTP accounts, database, WordPress hosting account, and your custom email addresses that use your site’s name.
Many beginners don’t like using strong passwords because they’re hard to recollect . The good thing is that you simply don’t got to remember passwords anymore. You can use a password manager.
See our guide the way to manage WordPress passwords.
Another way to scale back the danger is to not give anyone access to your WordPress admin account unless you absolutely need to .
If you’ve got an outsized team or guest authors, then confirm that you simply understand user roles and capabilities in WordPress before you add new user accounts and authors to your WordPress site.
The Role of WordPress Hosting
Your WordPress hosting service plays the most important role in the security of your WordPress site. A good shared hosting provider like Bluehost or HostGater takes extra measures to protect their servers against common threats.
Here is how a good web hosting company works in the background to protect your websites and data.
- They continuously monitor their network for suspicious activity.
- All good hosting companies have tools in place to prevent large scale DDOS attacks
- They keep their server software, php versions, and hardware up to date to prevent hackers from exploiting a known security vulnerability in an old version.
- They have ready to deploy disaster recovery and accidents plans which allows them to protect your data in case of major acciden
On a shared hosting plan, you share the server resources with many other customers. This opens the danger of cross-site contamination where a hacker can use a neighboring site to attack your website.
Using a managed WordPress hosting service provides a safer platform for your website. Managed WordPress hosting companies offer automatic backups, automatic WordPress updates, and more advanced security configurations to guard your website
We recommend chemicloud as our preferred managed WordPress hosting provider. They’re also the most popular one in the industry.
You can also try Fastcomet which is a good alternative for Chemicloud.
WordPress Security in Easy Steps (No Coding)
We know that improving WordPress security can be a terrifying thought for beginners. Especially if you’re not techy. Guess what – you’re not alone.
We have helped thousands of WordPress users in hardening their WordPress security.
We will show you how you can improve your WordPress security with just a few clicks (no coding required).
If you can point-and-click, you can do this!
Install a WordPress Backup Solution

Backups are your first defense against any WordPress attack. Remember, nothing is 100% secure. If government websites are often hacked, then so can yours.
Backups allow you to quickly restore your WordPress site just in case something bad was to happen.
There are many free and paid WordPress backup plugins that you simply can use. The most important thing you would like to understand when it involves backups is that you simply must regularly save full-site backups to a foreign location (not your hosting account).
We recommend storing it on a cloud service like Amazon, Dropbox, or private clouds like Stash.
Based on how frequently you update your website, the perfect setting could be either once each day or real-time backups.
Thankfully this may be easily done by using plugins like UpdraftPlus or BlogVault. They are both reliable and most significantly easy to use (no coding needed).
Best WordPress Security Plugin
After backups, subsequent thing we’d like to try to to is about up an auditing and monitoring system that keeps track of everything that happens on your website.
This includes file integrity monitoring, failed login attempts, malware scanning, etc.
Thankfully, this will be all taken care of by the simplest free WordPress security plugin, Sucuri Scanner.
You need to put in and activate the free Sucuri Security plugin. For more details, please see our step-by-step guide on how to install a WordPress plugin.
Upon activation, you would like to travel to the Sucuri menu in your WordPress admin. The first thing you’ll be asked to try to to is Generate a free API key. This enables audit logging, integrity checking, email alerts, and other important features.
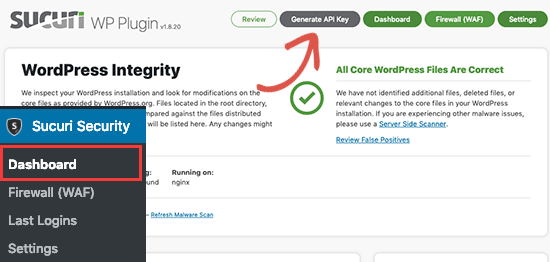
The next thing, you need to do is click on the ‘Hardening’ tab from the settings menu. Go through every option and click on the “Apply Hardening” button.
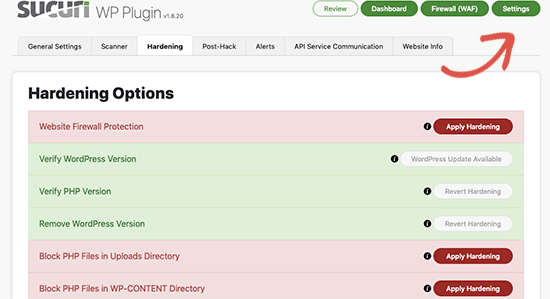
These options assist you lock down the key areas that hackers often use in their attacks. The only hardening option that’s a paid upgrade is that the online Application Firewall which we’ll explain within subsequent step, so skip it for now.
We have also covered tons of those “Hardening” options later during this article for those that want to try to do it without employing a plugin or those that need additional steps like “Database Prefix change” or “Changing the Admin Username”.
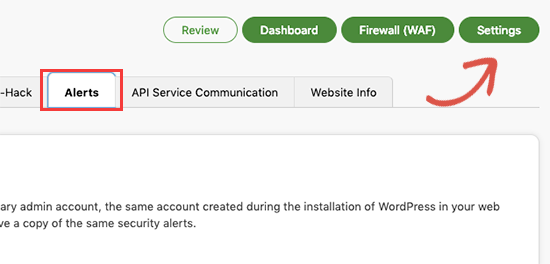
After the hardening part, the default plugin settings are ok for many websites and don’t need any changes. The only thing we recommend customizing is ‘Email Alerts’.
The default alert settings can clutter your inbox with emails. We recommend receiving alerts for key actions like changes in plugins, new user registration, etc. You can configure the alerts by getting to Sucuri Settings » Alerts.
This WordPress security plugin is very powerful, so browse through all the tabs and settings to see all that it does such as Malware scanning, Audit logs, Failed Login Attempt tracking, etc.
Enable Web Application Firewall (WAF)
The easiest way to protect your site and be confident about your WordPress security is by using a web application firewall (WAF).
A website firewall blocks all malicious traffic before it even reaches your website.
DNS Level Website Firewall – These firewall route your website traffic through their cloud proxy servers. This allows them to only send genuine traffic to your web server.
Application Level Firewall – These firewall plugins examine the traffic once it reaches your server but before loading most WordPress scripts. This method is not as efficient as the DNS level firewall in reducing the server load.
To learn more, see our list of the best WordPress firewall plugins.
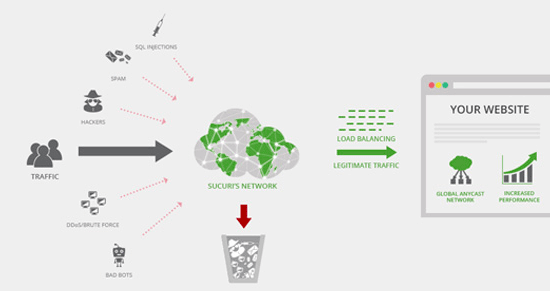
We use and recommend Sucuri as the best web-application firewall for WordPress. You can read about how Sucuri helped us block 450,000 WordPress attacks in a month.
Fastcomet
Technologies
- 27/7/365 Support
- FastGuard Hosting Security
- Datacenters Think Global, Host Local
- 99.9% uptime commitment
Note: We’re talking about the username called “admin”, not the administrator role.
Disable File Editing
define( ‘DISALLOW_FILE_EDIT’, true );
Alternatively, you can do this with 1-click using the Hardening feature in the free Sucuri plugin that we mentioned above.
Disable PHP File Execution in Certain WordPress Directories
Another way to harden your WordPress security is by disabling PHP file execution in directories where it’s not needed such as /wp-content/uploads/.
You can do this by opening a text editor like Notepad and paste this code:
|
1
2
3
|
<Files *.php>deny from all</Files> |
Next, you need to save this file as .htaccess and upload it to /wp-content/uploads/ folders on your website using an FTP client.
For more detailed explanation, see our guide on how to disable PHP execution in certain WordPress directories
Alternatively, you can do this with 1-click using the Hardening feature in the free Sucuri plugin that we mentioned above.
Limit Login Attempts
By default, WordPress allows users to undertake to log in as repeatedly as they need . This leaves your WordPress site susceptible to brute force attacks. Hackers attempt to crack passwords by trying to log in with different combinations.
This can be easily fixed by limiting the failed login attempts a user can make. If you’re using the online application firewall mentioned earlier, then this is often automatically taken care of.
However, if you don’t have the firewall setup, then proceed with the steps below.
First, you need to install and activate the Login LockDown plugin. For more details, see our step by step guide on how to install a WordPress plugin.
Upon activation, visit Settings » Login LockDown page to setup the plugin.
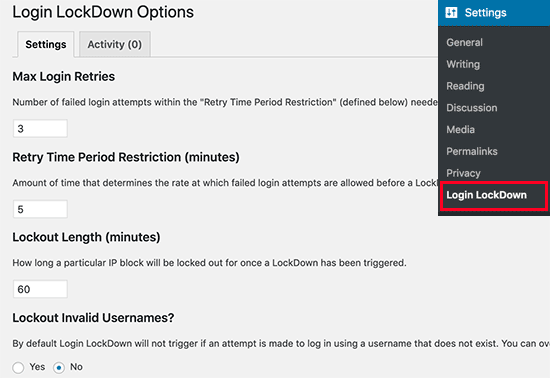
For detailed instructions, take a look at our guide on how and why you should limit login attempts in WordPress.
Add Two Factor Authentication
The two-factor authentication technique requires users to log in by employing a two-step authentication method. The first one is that the username and password, and therefore the second step requires you to authenticate employing a separate device or app.
Most top online websites like Google, Facebook, Twitter, allow you to enable it for your accounts. You can also add equivalent functionality to your WordPress site.
First, you need to install and activate the Two Factor Authentication plugin. Upon activation, you need to click on the ‘Two Factor Auth’ link in WordPress admin sidebar.
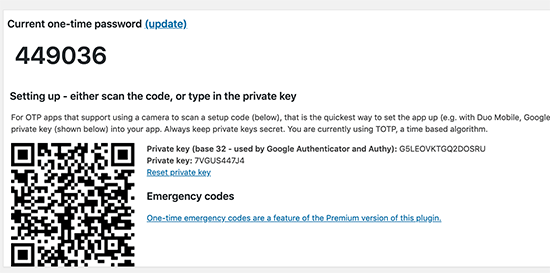
We will be using the LastPass Authenticator for the tutorial. However, instructions are similar for all auth apps. Open your authenticator app, then click on the Add button.
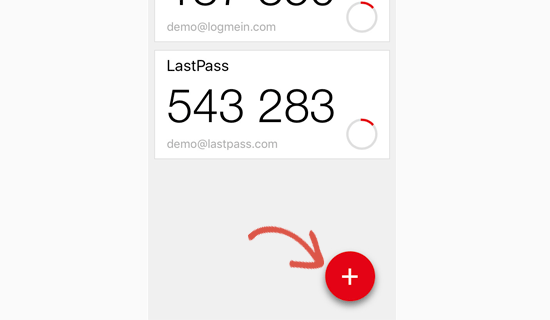
That’s all, your authentication app will now reserve it . Next time you log in to your website, you’ll be asked for the two-factor auth code after you enter your password.

Simply open the authenticator app on your phone and enter the code you see on it.
Change WordPress Database Prefix
By default, WordPress uses wp_ because of the prefix for all tables in your WordPress database. If your WordPress site is using the default database prefix, then it makes it easier for hackers to guess what your table name is. This is why we recommend changing it.
You can change your database prefix by following our step-by-step tutorial on the thanks to change WordPress database prefix to reinforce security.
Note: This can break your site if it’s not done properly. Only proceed, if you feel comfortable with your coding skills.
Password Protect WordPress Admin and Login Page
Normally, hackers can request your wp-admin folder and login page with none restriction. This allows them to undertake their hacking tricks or run DDoS attacks.
You can add additional password protection on a server-side level, which can effectively block those requests.
Follow our step-by-step instructions on how to password protect your WordPress admin (wp-admin) directory.
Disable Directory Indexing and Browsing
Directory browsing are often employed by hackers to seek out out if you’ve got any files with known vulnerabilities, in order that they can cash in of those files to realize access.
Directory browsing also can be employed by people to seem into your files, copy images, determine your directory structure, and other information. This is why it’s highly recommended that you simply close up directory indexing and browsing.
You need to attach to your website using FTP or cPanel’s file manager. Next, locate the .htaccess enter your website’s root directory. If you can’t see it there, then ask our guide why you can’t see .htaccess enter WordPress.
After that, you need to add the following line at the end of the .htaccess file:
Options -Indexes
Don’t forget to save and upload .htaccess file back to your site. For more on this topic, see our article on how to disable directory browsing in WordPress.
Disable XML-RPC in WordPress
XML-RPC was enabled by default in WordPress 3.5 because it helps to attach your WordPress site with web and mobile apps.
Because of its powerful nature, XML-RPC can significantly amplify brute-force attacks.
For example, traditionally if a hacker wanted to undertake 500 different passwords on your website, they might need to make 500 separate login attempts which can be caught and blocked by the login lockdown plugin.
But with XML-RPC, a hacker can use the system. multicall function to undertake thousands of passwords with say 20 or 50 requests.
This is why if you’re not using XML-RPC, then we recommend that you simply disable it.
There are 3 ways to disable XML-RPC in WordPress, and that we have covered all of them in our step-by-step tutorial on the way to disable XML-RPC in WordPress.
Tip: The .htaccess method is that the best one because it’s the smallest amount resource-intensive.
If you’re using the online application firewall mentioned earlier, the firewall will take care of this.
Automatically log out Idle Users in WordPress
Logged-in users can sometimes stray from the screen, and this poses a security risk. Someone can hijack their session, change passwords, or make changes to their account.
This is why many banking and financial sites automatically sign off an inactive user. You can implement similar functionality on your WordPress site also.
You will need to install and activate the Inactive Logout plugin. Upon activation, visit Settings » Inactive Logout page to configure plugin settings.
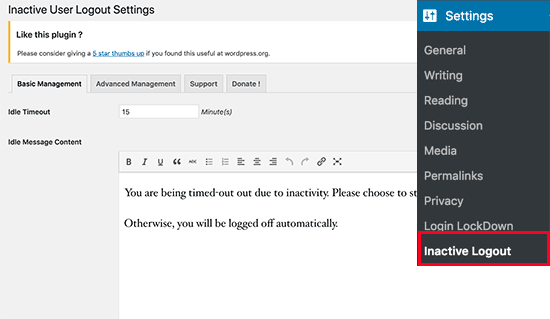
Simply set the time duration and add a logout message. Don’t forget to click on the save changes button to store your settings.
Add Security Questions to WordPress Login Screen
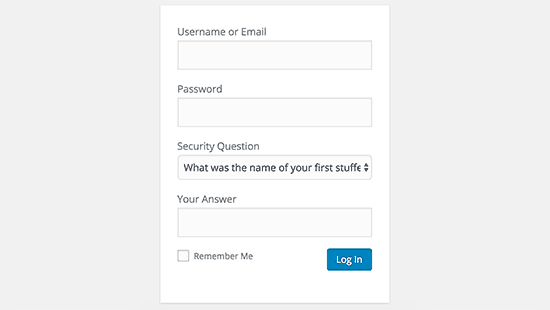
Adding a security question to your WordPress login screen makes it even harder for somebody to urge unauthorized access.
You can add security questions by installing the WP Security Questions plugin. Upon activation, you would like to go to the Settings » Security Questions page to configure the plugin settings.
Scanning WordPress for Malware and Vulnerabilies

If you’ve got a WordPress security plugin installed, then those plugins will routinely check for malware and signs of security breaches.
However, if you see a sudden drop in website traffic or search rankings, then you’ll want to manually run a scan. You can use your WordPress security plugin, or use one among these malware and security scanners.
Running these online scans is sort of straightforward, you only enter your website URLs and their crawlers undergo your website to seem for known malware and malicious code.
Now confine mind that the majority WordPress security scanners can just scan your website. They cannot remove the malware or clean a hacked WordPress site.
This brings us to subsequent section, cleaning up malware and hacked WordPress sites.
Fixing a Hacked WordPress Site
Many WordPress users don’t realize the importance of backups and website security until their website is hacked.
Cleaning up a WordPress site are often very difficult and time-consuming. Our first advice would be to let a knowledgeable lookout of it.
Hackers install backdoors on affected sites, and if these backdoors aren’t fixed properly, then your website will likely get hacked again.
Allowing knowledgeable security company like Sucuri to repair your website will confirm that your site is safe to use again. It will also protect you against any future attacks.
For adventurous and DIY users, we’ve compiled a step-by-step guide fixing a hacked WordPress site.
That’s all, we hope this text helped you learn the highest WordPress security best practices also as discover the simplest WordPress security plugins for your website.
For more detailed instructions, see our tutorial on how to add security questions to the WordPress login screen.